
Vi ricordate del mio Blogger Day Viridea del mese scorso? Tra le sorprese della giornata, la più bella è stata una "sifda" a colpi di tutorial green tra noi blogger partecipanti, che oggi finalmente vi possiamo svelare: spero che vi piaccia la mia idea per partecipare al contest!
Do you remember my last Blogger Day Viridea? The most beautiful surprise of the day was a "green tutorial contest" between bloggers... And now we can finally reveal it: I hope you'll like my idea!

Non essendo una crafter esperta, ho deciso di proporvi due tutorial molto semplici, da realizzare con materiali di recupero che avete in casa: io stessa non ho dovuto comprare nulla, a parte le piantine aromatiche da rinvasare! Sono DIY versatili e alla portata di tutti, anche delle più pasticcione (voglio dire, se ci sono riuscita io...). Ecco cosa vi serve:
1. Sacchetti di carta di recupero (vanno bene anche quelli del pane)
2. Sacchetti di plastica trasparenti di media dimensione
3. Piantine a piacere
4. Matita, gomma, pennarelli, e una squadretta... se come me siete delle precisine ;)
5. Nastri/spago e carta colorata per la ghirlanda: io ho utilizzato quella di Kitiama che ci hanno regalato all'evento... era troppo bella!
Since I'm not an expert crafter, I decided to offer you two very simple tutorials, made with recycled materials you can find in your homes too. I didn't have to buy anything, except forthe aromatic plants to repot! These DIYs are versatile and easy to try for everyone, even the most bumbling ones (I mean, if even I could make it...). Here's what you need:
1. Waste paper bags (even bread ones are good)
2. Transparent plastic bags
3. Your favorite little greenies
4. Pencil, eraser, markers, and a bracket ... if you are as meticulous as I am ;)
5. Tapes / string and colored paper to make the garland: I used the one that Kitiama gift us... it's just too cute!

step by step: per i vasi
1. Disegnate sul lato più ampio del sacchetto il motivo che preferite a matita. Io ho scelto dei motivi minimal, ma potete sbizzarrirvi! E non serve che siate troppo pignole come me, ciò che è fatto a mano è bello anche se ha qualche imprecisione ;)
2. Ripassate il vostro disegno a pennarello, con i colori che preferite
3. Rivestite internamente il sacchetto di carta con un altro di plastica, da riempire di terra.
4. Rinvasate la vostra piantina e... sì, avete già finito!
step by step: the pots
1. Draw with a pencil the graphic you prefer on the largest side of the bag. I chose some minimal signs, but you can go wild! You don't need to be too much meticulous like me, handmade things have to be a little inaccurate too ;)
2. Brush up your drawing with colored markers
3. Coat internally your paper bag with a plastic one, than fill it with some ground
4. Repot your plants and... yes, that's all!


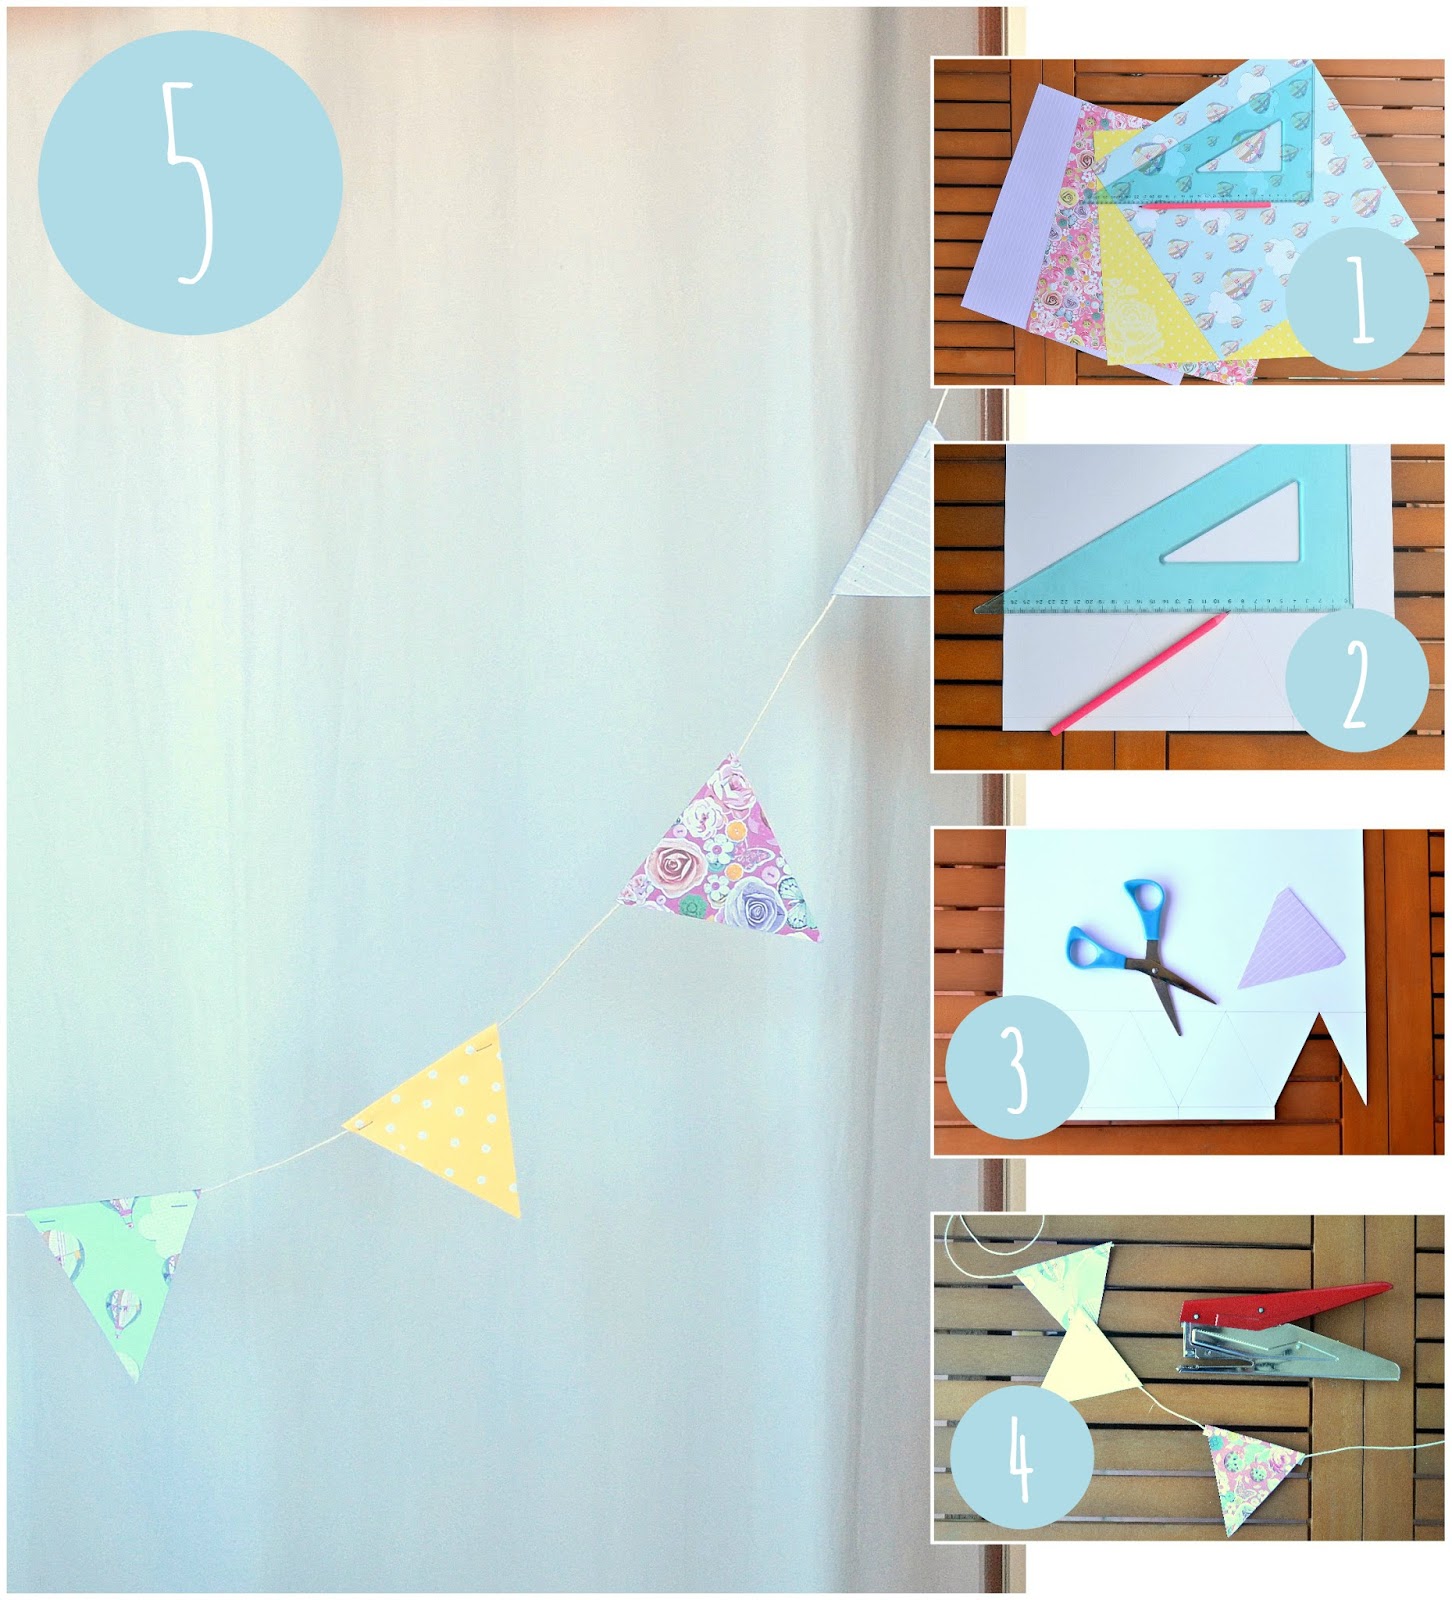
step by step: per la ghirlanda
1. Disegnate, sul retro della vostra carta preferita, dei triangoli di dimensioni uguali (qui sì che vi suggerisco di usare la squadretta)
2. Ritagliateli e pinzateli allo spago o al nastro che preferite
3. Appendete la ghirlanda con il washi tape!
step by step: the garland
1. Draw some triangles of equal size on the back of your favorite paper (I suggest you to use the bracket this time)
2. Cut them out and staple them to the string or ribbon you prefer
3. Hang the garland with the washi tape!
Photos by T h e P e p p e r m i n t L a n d
...e ora tocca a voi! Se vi è piaciuto il mio tutorial, votatemi lasciando un like alla mia foto nella pagina facebook di Viridea: anche se, a dirla tutta, la concorrenza è spietata eheh :)
... and now it's up to you! If you enjoyed my tutorial, please leave me your "like" on my photo in the Viridea facebook page. Even if - to be honest - my competitors are really good hehe :)
...ma quanto carino è?!?
RispondiEliminaoggi ne faccio uno per la mia mamma!!
UUUU spero che le piacerà!!!
Eliminasuperfacili e supercarini!
RispondiEliminaGrazie Anna!
Elimina